
Order an Ion AmpliSeq™ custom panel
If you have not already done so, use one of the following methods to create a new Ion AmpliSeq™ custom panel, depending on the application.
After creating and submitting a new Ion AmpliSeq™ custom panel, use the Results ready screen to review design details and place an order.
Designs with more than 4,999 amplicons cannot be ordered directly through Ion AmpliSeq™ Designer. You must send the SOS document to a Customer Service representative for help to place the order. For more information, see Order a design with more than 4,999 amplicons and About Standard Order Sheet (SOS).
- In the navigation bar, click , then in the row of the design of interest, click the link in the Design column.
-
Review the design.
Option
Description
View another design
From the Switch design dropdown list, select a design of interest (see callout 1 in Figure 1).
Note: Depending on the status of the selected design, either the draft design screen or the results ready screen is displayed.
Edit design name and details
Click Edit, then in the Edit your design screen, modify the design name and details. Click Save. See callout 2 in Figure 1.
Copy targets to a new design
After you submit the design, the targets are locked (
 ) and can no longer be edited. To modify the design, you can copy targets to a new design, then make changes, if needed.
-
Click Copy Targets (see callout 3 in Figure 1).
-
In the Copy Design dialog box, select the panel type and DNA type, then enter the new design name and details.
The new design is added to the list of designs in the draft status. To modify the design, see Start a new Ion AmpliSeq DNA Gene design.
Copy amplicons to another design
You can copy all or a subset of amplicons to an existing or a new design. For more information, see Copy existing amplicons.
View an amplicon size distribution histogram[1]
-
Click Amplicon Distribution (see callout 4 in Figure 1).
-
(Optional) In the amplicon distribution dialog box, click Download to download a PNG image of a histogram to the computer.
Increase coverage
To improve coverage, click increase coverage, then in the Increase Coverage dialog box, click Accept (see callout 5 in Figure 1).
Ion AmpliSeq™ Designer computes multiple solutions for each submitted design. The design pipeline maximizes the coverage over targets with the highest quality primers possible. After the first design, in an iterative process, primer design constraints are relaxed to fill in the gaps in coverage. This process helps maximize both the coverage over the targets and the quality of primers selected. Lower specificity primers are only allowed in later stages of the iterative design process to cover the remaining gaps in coverage. When finished, the panel with the non-standard solution is added to the ordering options in the Results ready screen (see step 3).
Note: For some designs, multiple solutions are not available.
Estimate chip usage
Click Chip Calculator (see callout 6 in Figure 1). For more information, see Chip Calculator.
Download results files
Results files for a custom design include BED files, amplicon and insert size histogram PNG files, coverage summary and coverage details CSV files, and a run plan JSON file for use in creating run plans in Torrent Suite™ Software.
-
Click Download results (see callout 7 in Figure 1).
A ZIP file that contains all the results files is automatically downloaded to the computer. For file descriptions, see Ion AmpliSeq Custom panel files.
Share the design
-
Click Sharing (see callout 9 in Figure 1).
-
In the Sharing dialog, enter the email address of the person with whom you want to share the design, enter and an optional message, then click Share.
For more information, see Manage shared designs.
Export a CSV file that contains the list of genes that are included in the panel
-
Click Export (see callout 9 in Figure 1).
A CSV file is automatically downloaded to the computer.
Export a CSV file that contains a list of the amplicons
-
Click Export (see callout 9 in Figure 1).
A CSV file is automatically downloaded to the computer.
1 Option not available for RNA Gene Fusion designs.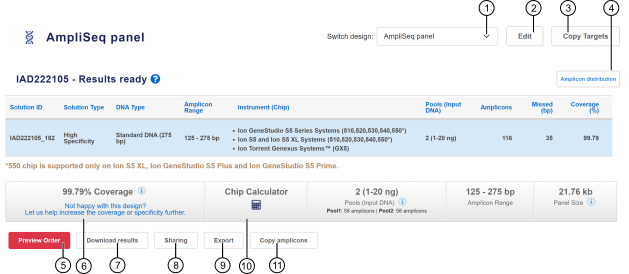 Figure 1. Results ready screen
-
From the dropdown list, select to view another design.
-
Copy targets to a new design.
-
View or download the amplicon size distribution histogram.
-
Make instrument and configuration selections and proceed to ordering the panel.
-
Improve design coverage using one of the available solutions.
-
Click to download results file to the computer.
-
Share the design.
-
Export a CSV file that contains the list of genes that are included in the panel.
-
Copy amplicons to a new or an existing design.
-
- If you generated multiple coverage solutions for the design, click to select the solution that you want to order.
-
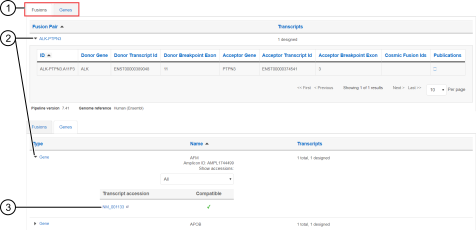
(RNA Gene Fusion designs only) In the targets table at the bottom of the Results ready screen, review the list of the targets that are included in the panel. Click
 (Expand) to view details for each target.
- When you are ready to order the panel, click Preview Order (see callout 5 in Figure 1).
-
In the Order options dialog box, select the instrument, then click Next.
If you selected the Genexus™ Integrated Sequencer, proceed directly to step 8.
- In the Library preparation format dialog box, select the Manual or Ion Chef™ format, then click Next.
-
In the Format option dialog box, select Tubes of primer pools only or Tubes plus 384 well plates, then select special instructions, if any. Click Next.
For more information about configuration options, or special instruction selections, see Ion AmpliSeq Made-to-Order designs: configuration options.
-
In the Order preview screen, review design order details, then, if needed, add consumables to the order.
-
In the ordering options pane, click List recommended consumables.
A list of available kits is shown. The kits that are listed depend on the previous selections and can include groups of lists in Library preparation, Template preparation and sequencing, Barcodes, Chips, and Additional material sections.
-
In the row of each kit that you want to add to the order, enter the quantity in the Qty field or click
 to set the value to the desired quantity.
The list price for the item or items is updated.
- Make changes if needed.
-
When finished, click Add all to cart.
The design that is added to the cart is based on the sequencing platform, template preparation, and ordering format selections that you have made.
-
In the ordering options pane, click List recommended consumables.


You are redirected to the Cart on thermofisher.com, where you can add or remove items from the order if needed, view product price estimates, and start the checkout process.