
Start a new Ion AmpliSeq™ HD RNA Gene Fusion design
Select the RNA Gene Fusion design option to make an RNA Gene Fusion panel to detect expression of known gene fusions of interest in your samples.
- In the home screen, in the Ion AmpliSeq™ HD Custom panels pane, click Create Custom HD panel.
- In the Start a new Ion AmpliSeq™ HD design screen, in the Name and details step, enter a design name and optional details.
- In the Application Type step, click RNA Gene Fusion designs (single‑pool).
-
In the
Select genome to use
step, accept the default
Human (RefSeq/Ensemble)
selection.
IMPORTANT! RNA Gene Fusion designs are only compatible with Human (RefSeq/Ensemble) genomes.
-
Click
Next: Add Targets.
A draft design screen opens (see Figure 1).
-
Add targets using the options available in
the target addition pane (see callout 1 in Figure 1).
For guidelines on how to add targets, see Ion AmpliSeq HD Custom panels: RNA Gene Fusion design input specifications.
Option
Description
Add each target manually using a HGNC-approved gene symbols that follow the HUGO nomenclature.
-
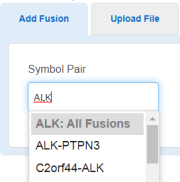
In the Add Fusion tab, in the Symbol Pair field, select the desired fusion using one of the following options.
-
Enter a complete donor-acceptor gene symbol pair in the [DONOR]-[ACCEPTOR] format, then select the desired donor-acceptor pair from the dropdown list.
-
Start typing a donor or acceptor gene symbol, then select the desired donor-acceptor pair from the dropdown list.
-
Start typing a donor or acceptor gene symbol, then select <gene symbol>: All Fusions from the dropdown list.
The target addition pane populates with a list of all available fusions for a gene or a gene pair. If you selected the <gene symbol>: All Fusions option, then all the available fusions for a gene are listed.
-
-
Select the checkbox in the row of each fusion that you want to add to your design, then click Add fusion(s) (see callout 2 in Figure 1).
If a target was added successfully, the Target saved successfully message appears. If a duplicated target is detected, 1 duplicate fusion ignored message is displayed, and the duplicated target is not added.
-
Repeat steps 1–2 for each additional fusion target.
Upload multiple targets at one time using a CSV file.
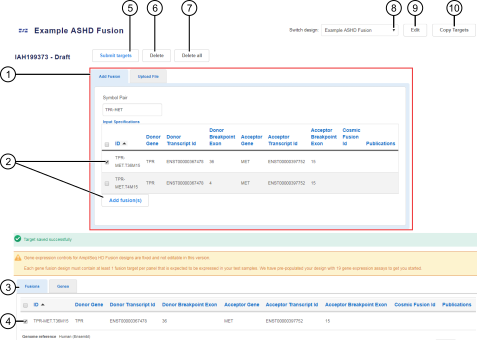 Figure 1. Draft design
screen
Figure 1. Draft design
screen
-
A target addition pane with multiple methods for adding targets to a design.
-
Select one or more fusions of interest, then click Add fusion(s) to add the selections to your design.
-
Targets table lists all added targets in a design. The Fusion tab lists the fusions that are included in your design. The Genes tab lists the gene expression assays that are included in your design.
-
Select the checkbox in the row of each target that you want to delete.
-
Click to submit a design.
-
Click to delete the selected targets (see callout 4).
-
Click to delete all targets.
-
Select from the dropdown list to display a different design.
-
Click to edit design name and details.
-
Click to copy targets to a new custom design.
The software uploads the targets, checks them, and verifies regions. The targets are added to the targets table under the Fusions tab (see callout 3 in Figure 1).
-
- In the targets table, click the Genes tab to review the pre-populated list of genes expression controls (see callout 3 in Figure 1).
-
Review and modify the design as
needed.
Action
Description
Delete targets
In the targets table, select the checkbox in the row of one or more targets, then click Delete. To delete all targets, click Delete all (see callouts 4, 6, and 7 in Figure 1).
Edit design name and details
Click Edit, then in the Edit your design screen, modify design name and details as needed. Click Save. See callout 9 in Figure 1.
Copy targets to a new design
Click Copy Targets, then in the Copy Design dialog, select the panel type and enter the name and details for the new design. Click Save. See callout 10 in Figure 1.
The new design is added to the list of your custom designs. To view or edit the new design, click in the navigation bar. Alternatively, open a new design by selecting a design from the Switch design dropdown list (see callout 8 in Figure 1). For designs that have been submitted, or locked, the design opens to the Results ready screen.
-
To submit your panel, click
Submit targets,
then click
OK to
confirm your submission (see callout 5 in Figure 1).
Up to 5 designs can be submitted at one time.
After submission, a submitted design screen opens, displaying the design confirmation message.
After you submit your design, the targets are locked ( ) and can no longer be edited.
When the assay design results are ready, you receive an e‑mail notification
instructing you to review the results in Ion AmpliSeq™ Designer. Click the
View results
link provided in the email to be directed to the results page. Alternatively, sign
in to Ion AmpliSeq™ Designer (AmpliSeq.com), then in the navigation bar
click to access the results for your design (see My Designs).
) and can no longer be edited.
When the assay design results are ready, you receive an e‑mail notification
instructing you to review the results in Ion AmpliSeq™ Designer. Click the
View results
link provided in the email to be directed to the results page. Alternatively, sign
in to Ion AmpliSeq™ Designer (AmpliSeq.com), then in the navigation bar
click to access the results for your design (see My Designs).
To review design details and place an order, proceed to Order an Ion AmpliSeq HD custom panel.